Feed Aram Bartholl [copy] http://datenform.de/blog/feed/ has loading error: A feed could not be found at `http://datenform.de/blog/feed/`; the status code is `200` and content-type is `text/html; charset=UTF-8`
Feed Cem TEZCAN [copy] https://yewtu.be/feed/channel/UCGcjzzEmGThh35eeDkvydeg has loading error: cURL error 22: The requested URL returned error: 403
Feed designboom magazine [copy] http://shalnoff.co.uk/rss.php?rss=designboom has loading error: cURL error 22: The requested URL returned error: 403 Forbidden
Feed Kinote.info [copy] http://kinote.info/sections/blog/articles.xml has loading error: http://kinote.info/sections/blog/articles.xml is invalid XML, likely due to invalid characters. XML error: Invalid document end at line 1031, column 7
How to execute a script from the command line in Blender
With Blender you can execute a Python script when Blender is launched by specifying the scipt:
>blender -P myscript.py
 dataorigami.blogspot.co.uk
Blender tranform matrix and building scenes from primitive meshes
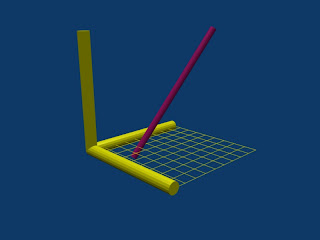
In this tutorial, we'll work through several concepts in Blender. The three key concepts covered are: the use of the transform matrix (mesh.transform()) to orient and place a mesh in a scene, the use of material properties to control how a mesh is rendered, and the use of Blender Vector and Matrix classes. This example was built to begin working towards the generation of graphs in Blender. One of the first steps in generating graphs is the ability to draw a line from one point to another. This can be done in many ways. Two ways to do this are the direct generation of...
dataorigami.blogspot.co.uk
Using Python and Blender Game Engine to build an interactive visualization

The purpose of this example is to demonstrate how to use Python and the Blender Game Engine (BGE) to create an interactive visualization. When done, the blender model will allow you to rotate and move a polyhedron (pyramid) using the arrow keys when the game engine is running. I'm assuming you have anough knowledge that I do not need to walk you through every step in the Blender environment. As far as I can tell, Blender 2.48 does not support programmatic definition of BGE sensors, controllers, and actuators. Therefore, to use Python to define an interactive visualization in Blender, we need...
dataorigami.blogspot.co.uk
How to generate an animation using Python in Blender
This script takes the default scene in Blender, removes the camera, lamp, and cube, then adds in a new camera, lamp, and polytope. On each frame in the animation, the polytope is rotated. The script generates an AVI file of the animation. Additionally, this script shows one way to unlink or delete an object from a scene. It also shows how to use python to add a script to a text object, then link that script to an event in Blender. Note: I could not get this script to work when creating a scene from scratch. There appears to be an flag...
dataorigami.blogspot.co.uk
How to create a Polyhedron in Blender using Python

In this example, a simple 4 sided polygon is generated using meshes. The bulk of the example is dedicated to setting up the cameras, lighting, and rendering the image. The mesh is generated and linked to the scene in the following lines: coords = [ [-1,-1,-1],[-1,-1,1],[-1,1,-1],[-1,1,1], [ 1,-1,-1],[ 1,-1,1],[ 1,1,-1],[ 1,1,1]] faces = [ [0,1,3],[0,1,5],[0,3,5],[1,3,5] ] me = bpy.data.meshes.new('myMesh') me.verts.extend(coords) me.faces.extend(faces) ob = scene.objects.new(me,'myObj') ob.setEuler(0.2,0.2,0.1) The material for the mesh is created in the following code: mat = Material.New('newMat') # create a new Material called 'newMat' mat.rgbCol = [0.8, 0.2, 0.2] # change its color Once the material is created, it is linked to the mesh (not the object linking...
dataorigami.blogspot.co.uk
An observation ...
Industrial research is the fine art of spending small amounts of money today to prevent spending large amounts later.
dataorigami.blogspot.co.uk